preFIX version 1.2 released

preFIX – getting those alignments done

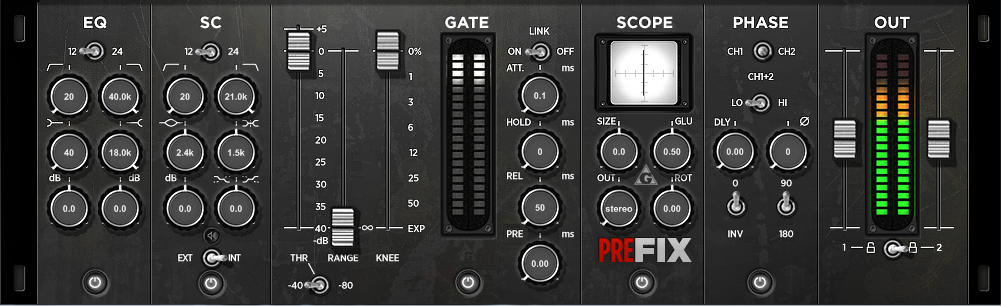
The 1.2 update introduces VST3 support and fixes an issue in the phase section (flipped 90/180 degree settings). The update also provides online documentation.

The update is available for Windows in VST and VST3 format as freeware. Download your copy here.

ThrillseekerXTC 3.0.1 bugfix release

Release 3.0.1 is now available for download and contains an important bugfix, which corrects an exaggeration of the side signal in the mid-frequency band. The update is available for Windows in VST and VST3 format as freeware. Download your copy here.

ThrillseekerXTC mkIII version released

ThrillseekerXTC: bringing mojo back

ThrillseekerXTC is a contemporary exciter build around a parallel analog equalizer design. It takes our hearing sensitivity into account especially regarding the perception of audio transients, masking effects and loudness. ThrillseekerXTC offers frequency boosting on three individual parallel bands with pre-selected frequency ranges for the low, mid and high frequency spectrum. The mid band also performs compression by an opto-electrical circuit. A dedicated output stage adds further idiosyncrasies typically found in transformer coupled tube stages.

ThrillseekerXTC is all about adding weight, vibe and attitude back to the sound. It delivers all the character of an analog signal path and provides what digital processing usually is hard pushed to, including a rich low-end experience and that vibrant expensive top-end. The mkIII version primarily introduces VST3 support as well as a number of changes and improvements in the following areas:

  • Decoupling EQ from DRIVE/MOJO controls – the latter now controls a dedicated downstream output amplifier stage
  • Improved overall THD performance featuring effectively distortion-free compression for the mid-range as well as a silky top-end
  • Updated components, two new audio transformer circuits introduced, new inductor based (LC) filter network

A complete list is provided in the included manual. The update is available for Windows in VST and VST3 format as freeware. Download your copy here.

BaxterEQ – update 1.2 available, adding VST3 support

BaxterEQ – transparent mastering and mix buss shelving EQ

Changes in version 1.2

  • VST3 support added

The update is available for Windows in VST and VST3 format as freeware. Download your copy here.

FlavourMTC “Mixbus Tone Control” released

FlavourMTC follows classic “passive” equalizer designs where the EQ circuits itself are not able to amplify signals but a dedicated amplifier stage takes care of it. Those EQ designs are well known for allowing very transparent frequency changes while their amplifier designs do add some icing on the cake quite often.

mixbus tone control – closest to analog

FlavourMTC implements this by utilizing 1st order shelving filter designs avoiding unwanted resonances and takes advantage of “zero delay” implementations for most accurate higher order filtering and w/o introducing curve warping near Nyquist frequency. The output amplifier stage of the plugin can be calibrated according specific mixing levels, provides a distinct “box tone” and glues everything together. Parts of the plugin are oversampled internally for maximum transparency and sound quality.

Available for Windows VST in 32 and 64bit as freeware. Download your copy here.

the twisted world of guitar pedals II

Meanwhile I had the opportunity to put my hands on some Fairfield Circuitry effect pedal stuff mentioned earlier here and the “Meet Maude” analog BBD delay was right here on my desk for a deeper inspection. My actual experience was a rather mixed one.

Focusing on a rather dark and LoFi sound quality on the one hand plus a rather simplistic feature set concept wise on the other, they do not appear to be very flexible in practise and this at a rather steep price point. They appear to be very noisy featuring all kinds of artifacts even when integrated to the mixing desk via reamping. One may call this the feature itself but at the end it makes it a one-trick pony. If you need exactly that, here you have it but you get nothing beyond that. To me this trade off was too big and so I send it back.

However, I found their nifty low pass gate implementation (very prominently featured within their “Shallow Water”) that much unique and interesting that I replicated it as a low pass filter alternative in software and to have it available e.g. for filtering delay lines in my productions. The “Shallow Water” box made me almost pull the trigger but all in all I think this stuff seems to be a little bit over-hyped thanks to the interwebs. This pretty much sums it up for now, end of this affair.

Timeline & BigSky – The new dust collectors?

Going into the exact opposite direction might be a funny idea and so I grabbed some Strymon stuff which aims to be the jack of all trades at least regarding digital delay and reverb in a tiny stomp box aka desktop package. To be continued …

Further readings about BBD delays:

Getting the most out of the SPL Tube Vitalizer

In this article I’m going to share some analysis insights but also proposing an easy to follow 3-step approach for finding the sweet spot while processing any kind of material with this device.

Preparing for winter season: room heating with style

So, having now a Tube Vitalizer here on my desk (at least for some time), I was surprised about the lack of usable online reviews and background information. One just finds the usual YT quality stuff which might be entertaining in the best case but also spreads misinformation ever so often. To save those influencers honor it must be said that the Vitalizer concept is really not that easy to grasp and its quirky user experience makes it not easier. The manual itself is a mixed bag since it contains some useful hints and graphs on the one hand but lots of marketing blurb obscuring things on the other. Time to clean up the mess a little bit.

What it actually does

While easily slotted into the “audio exciter” bucket, some more words are needed to describe what it actually does. Technically speaking, the Vitalizer is basically a parallel dynamic equalizer with an actual EQ curve behaviour which aims to mimic equal loudness contours as specified in ISO226. Rather simplified, it can be seen as a high and low frequency shelving EQ to dial in a basic “smile” EQ curve but one which takes hearing related (psychoacoustic) loudness effects into account. It does this also by generating curves differently based on signal levels, hence the term “dynamic EQ”. And wait, it also adds harmonic content galore.

Taming the beast

To obtain an equal loudness contour the main equalizers center frequency must be properly set depending on the tonal balance of the actual source material. This center frequency can be dialed in somewhere between 1k and 20kHz by adjusting the Hi-Mid Freq knob which defines a cross-over point: while frequencies below that point gets attenuated, the higher frequencies gets boosted. However, this attenuation is already a signal level dependent effect. Opposed to that, the LF EQ itself (which actually is not a shelving but a bell type curve) has a fixed frequency tuned to 50Hz and just the desired boost amount needs to be dialed in. The LF curve characteristic can be further altered (Bass soft/tight) which basically thickens or thins out the below 100Hz area. Finally, this EQ path can be compressed now with the Bass Comp option.

A typical EQ curve created by the Vitalizer

On top of the main EQ path, the Tube Vitalizer offers an additional HF boost and compression option which both can be dialed in to complement the LF behaviour in a very similar fashion but in the high frequency department. Internally, both are in a parallel configuration and mixed back into a dry signal path. The according Process Level knob can be seen as a kind of dry/wet option but only for main the EQ part. The upper HF part is mixed back in separately by the Intensity dial.

Gain-Staging is key

For the EQ section as a whole, the Drive knob is the ticket for proper gain-staging. If compression can be dialed in properly for both compressors (as indicated by the blue flashing lights) input gain is in the right ballpark. One might expect to hear actual compression going on but it appears to be a rather gentle leveling effect.

Gain-staging for the output stage has to be concerned separately which might become an issue if the tube stage is activated and operates in shunt limiting mode. Now you have to take care about proper input levels since the Attenuators for both output channels are operating after the limiter and not beforehand.

Tube stage limiting: input (red) vs output (blue)

Which directly leads us to the additional harmonic content created by this device. First of all, there is always additional harmonic content created by this device, no matter what. One might expect the device to not show any such content with the solid state output stage but it actually does. The tube output stage just increases that content but signal level dependent of course and 2nd order harmonics are always part of that content. A serious additional amount of harmonics gets added as soon as the HF filter gets engaged by dialing in Intensity (and LC Filter mode activated!) but this sounds always very smooth and natural in the top end, surprisingly.

Delicious content

Also impressive is the low noisefloor for both output stage modes, tube and solid state. The first one introduces pretty strong channel crosstalk, though.

Workflow – Finding the sweet spot in 3 easy steps

Initial condition:

  • Drive, Bass, Bass Comp and Intensity set to 0
  • Device is properly gain-staged

1. Set Process to 5 and now find the best fit for Hi-Mid Freq for the given source material. For already mixed 2bus stuff you can narrow it down to 2-3kHz most likely.

2. Dial in Bass (either left or right depending on source and taste) and some compression accordingly.

3. Only then dial in some further HF content via Intensity and some compression accordingly. Adjust HF Freq so it basically fits the source/taste.

Workflow – Tweaking just one knob

My good old buddy Bootsy told me this trick which works surprisingly well.

Initial condition:

  • Left most position: Bass
  • Right most position: Bass Comp, High Comp, High Freq
  • 12-o-clock position: Drive, Intensity
  • Hi-Mid-Freq set to 2.5kHz

Now, just dial in some (few) Process Level to taste.

He also recommends to drive the input to some extend (VU hitting the red zone) using the Tube stage in limiter mode while always engaging LC Filter mode for HF.

The Korg SDD-3000 – perfect for LoFi?

By accident, I recently stumbled upon the UAD Korg SDD-3000 digital delay version. When I noticed that they modelled also its amplifiers as well as the 13bit converters they immediately got my attention. Having also high- and low-pass filters on board, this could easily double as a great lofi device – so lets have a closer look.

As in the original hardware, the device offers several gain stage adjustments for both input and ouptut, intended to match different instrument or line level signals. These amplifiers are always in, no matter if the BYPASS switch is activated or not. Interestingly, UA also integrated this in its “Unison” interface feature as an preamp option.

Depending on how hard the input gain is driven, quite heavy distortion and saturation effects can occur. As soon as the Bypass is deactivated, the effect signal path containing the 13bit converted and HP/LP filtered signal can be dialed in with the LEVEL BALANCE. If this balance is now set to EFFECT only or just the WET SOLO option has been turned on (plus avoiding any amounts of feedback in this case) the device now offers a pretty much nicely degraded signal path for any sort of creative effects. Depending on the actual settings one can dial in now some really creamy or even gritty effects. Be aware, that this signal path contains an additional delay according to the DELAY TIME setting, of course.

The analysis charts are showing – from left to right – the basic frequency response (in bypass mode), some example harmonic distortions when hitting the input gain quite hard and the filtered effect signal path frequency response according to the UI settings above. The slight frequency bump on the right side of the charts might be caused by the plugin oversampling filters – the original hardware does not show this and its spectrum ends somewhere around 17kHz.

As in the original hardware, all settings are just within limited ranges and so it is not that flexible in general. However, soundwise its pretty much awesome. Oh and by the way, it also doubles as a simple but impressive delay 😉

tips&tricks with SlickEQ

SlickEQrouting

Note: Some of the tips rely on features from the GE version.

Mixing against HP/LP combo

A good generic practice when EQing several tracks in a mix is too start by dialing in HP/LP combinations by an  appropriate level and then do further EQing/mixing against those settings. Also using the tilt filter is a good idea to apply very first and rough tonal corrections and then working out the details afterwards with the three EQs.

Preserving low-end energy when high-pass filtering

A cool trick to preserve some low-end energy when high-pass filtering is applied is to boost the low-end while using the EQ-SAT feature. As you can see in the routing diagram the HPF comes after the main EQs and EQ-SAT. This way, harmonic overtones are generated based on the fundamentals before the HPF is applied.

Decoupling the low-end

The low-end EQ features a “Phi” option switch which allows to decouple the low-end by an allpass filter network. The crossover can be freely adjusted with the normal frequency control in this band while the gain control does not have any effect in this mode. This may work great for that mellow bass drums just as an example but in other cases it might loose some definition as a trade-off.

Compare different settings

SlickEQ contains two effect settings slots, A and B. Use them in combination with the automatic output gain control to AB test different settings. Within the plugin you can move settings between A and B but also copy&paste is there to freely copy settings between different plug-in instances. Also, undo/redo comes in handy here.

Adjusting precise values

The gain/frequency displays can also be used to enter specific values and also shortcuts are accepted, e.g. “5k” can be entered to set a value to 5000. And did you know that SlickEQ has mouse-wheel support?


out now: SlickEQ “Gentleman’s Edition”

SlickEQ_German

Key specs and features

  • Modern user interface with outstanding usability and ergonomics
  • Carefully designed 64bit “delta” multi-rate structure
  • Three semi-parametric filter bands, each with two shape options
  • Five distinct EQ models: American, British, German, Soviet and Japanese
  • Low band offers an optional phase-lag able to delay low frequencies relative to higher frequencies
  • High pass filter with optional “Bump” mode
  • Low pass filter with two different slopes (6dB/Oct and 12dB/Oct)
  • Parametric Tilt filter with optional “V” mode.
  • Six output stages: Linear, Silky, Mellow, Deep, Excited and Toasted
  • Advanced saturation algorithms by VoS (“Stateful saturation”)
  • Highly effective loudness compensated auto gain control
  • Stereo, mono and sum/difference (mid/side) processing options
  • Frequency magnitude plot
  • Tool-bar with undo/redo, A/B, advanced preset management and more

SlickEQ is a collaborative project by Variety of Sound (Herbert Goldberg) and Tokyo Dawn Labs (Vladislav Goncharov and Fabien Schivre). For more details, please refer to the official product page: http://www.tokyodawn.net/tdr-vos-slickeq-ge/

Related